Articles
Article
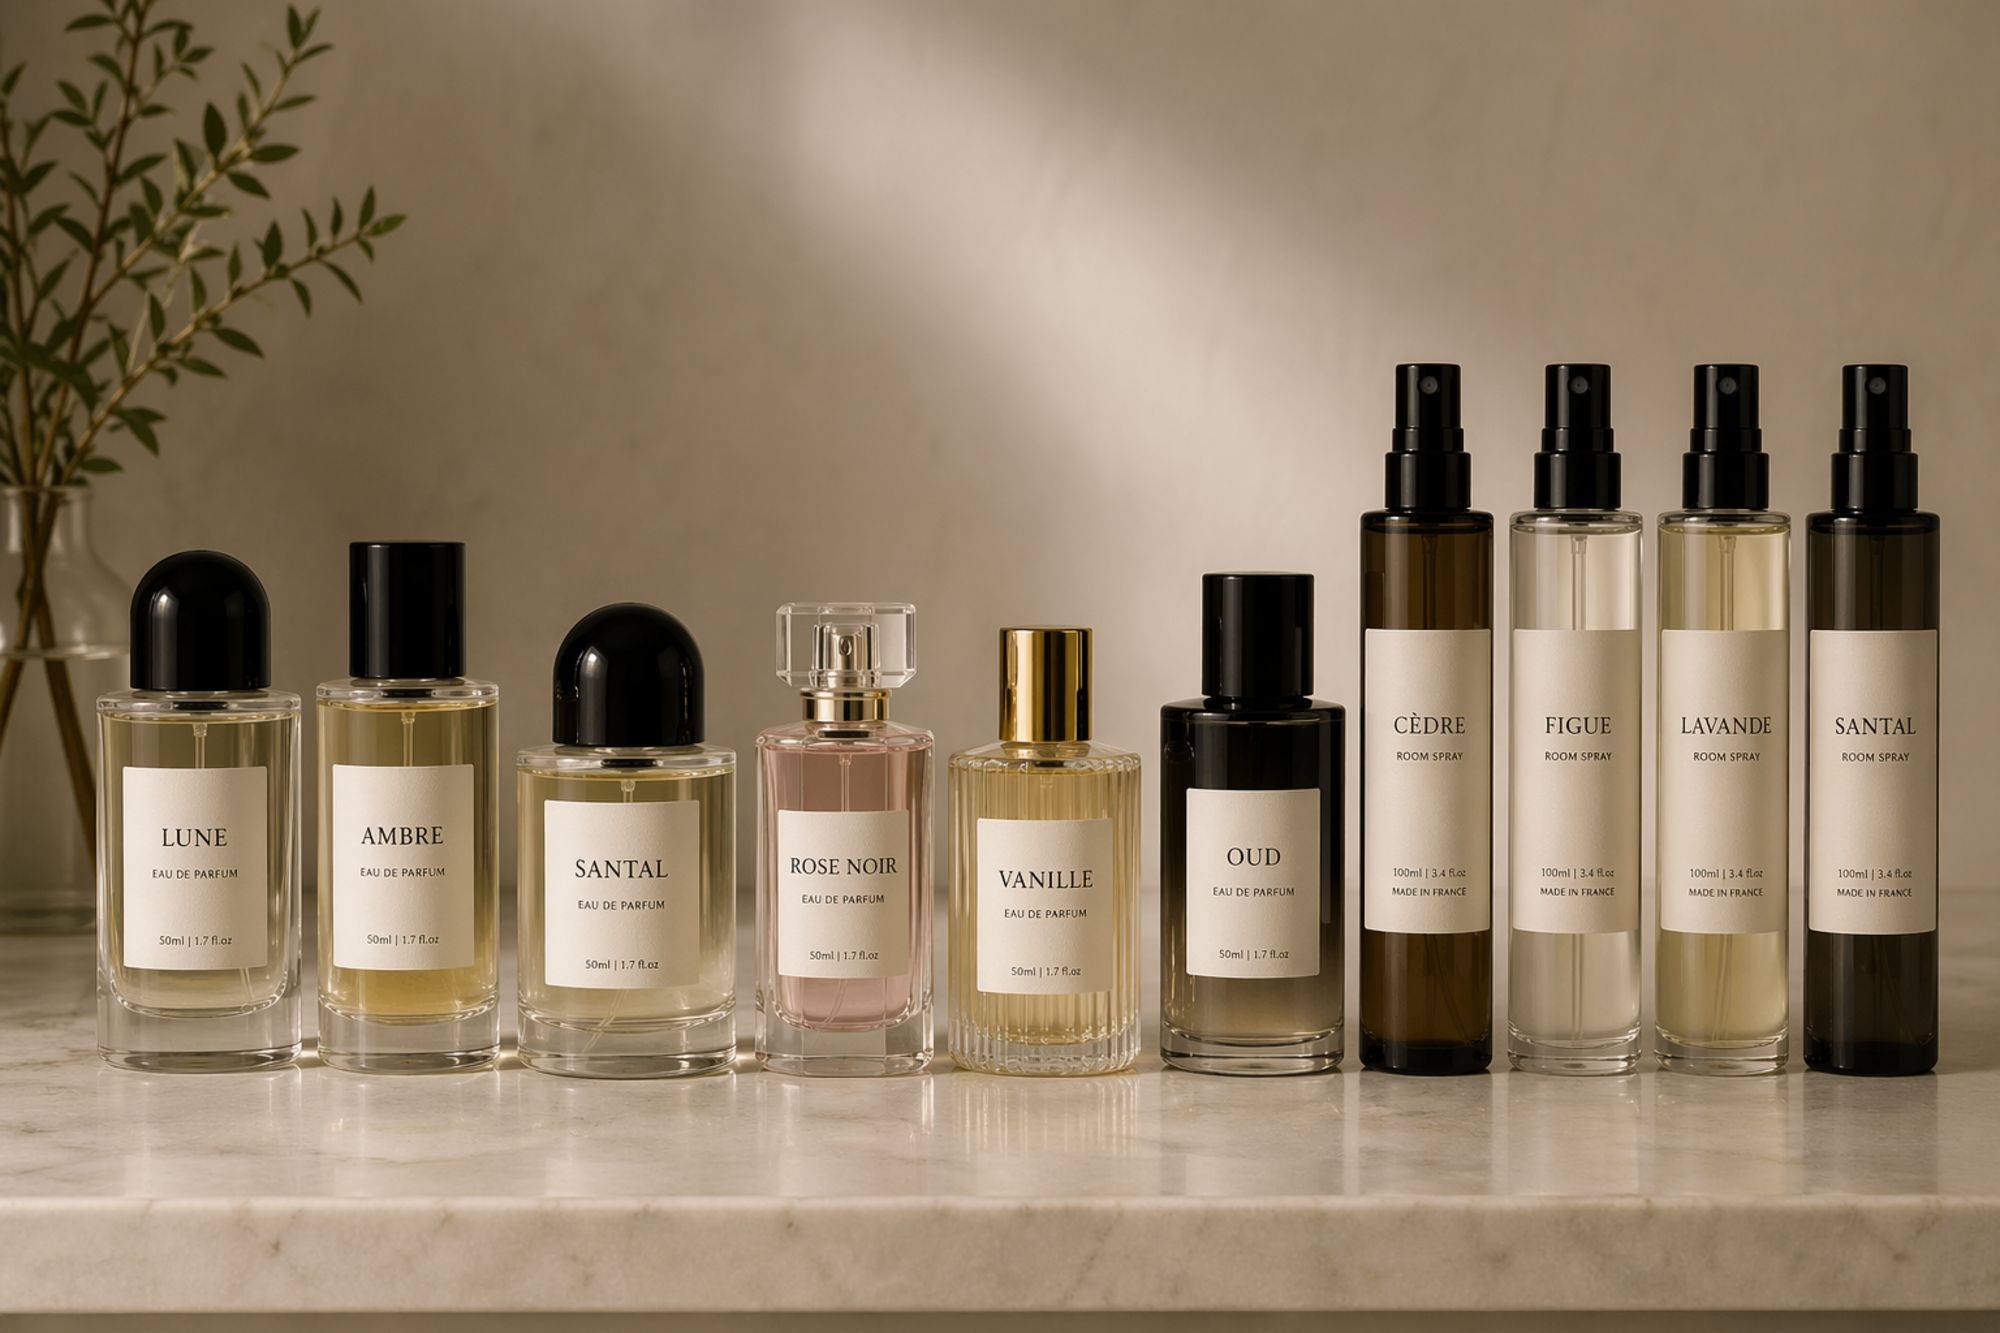
Where to Buy Dupe Perfumes and Fragrances Online
Where to Buy Dupe Perfumes & Fragrances Online (Without Compromising on Quality)
Luxury fragrance has a way of pulling you in. The depth, the longevity, the way a scent becomes part of your identity. But building a collection of designer perfumes can get expensive fast. That’s where dupe fragrances come in.
Well-made fragrance dupes capture the essence of iconic scents at a fraction of the price. And today, there are more places than ever to find them online. The key is knowing where to look, and what actually delivers.
What Are Dupe Fragrances?
Dupe perfumes are inspired by high-end, designer scents. They are not counterfeit products, but original formulations designed to smell similar to popular fragrances like Baccarat Rouge 540®, Aventus®, or Santal 33®.
The best dupes focus on:
Strong scent accuracy
Long-lasting performance
High-quality fragrance oils
Clean, wearable formulations
When done right, they allow you to experiment, layer, and build a scent wardrobe without the designer price tag.
Popular Places to Buy Dupe Perfumes Online
A few brands have become well-known in the dupe fragrance space.
Alt Fragrances and Dossier are two of the most commonly searched names. Both offer inspired-by scents modeled after popular luxury fragrances and have helped introduce many shoppers to the concept of dupes.
They’re a good starting point if you’re exploring the category. But as the space has evolved, expectations around quality, performance, and scent accuracy have shifted.
The Best Place to Buy Dupe Perfumes Right Now
If you’re looking for a more elevated dupe experience, Así Scents stands out.
Explore dupe perfumes inspired by luxury fragrancesShop long-lasting designer-inspired scents
Así is built for fragrance lovers who want more than just a “similar smell.” The focus is on creating scents that feel complete, balanced, and wearable throughout the day.
What Makes Así Different
1. Premium scent performanceThese aren’t watered-down interpretations. Así fragrances are designed for noticeable projection and staying power.
2. Wide range of iconic inspirationsThe collection includes dupes inspired by some of the most sought-after fragrances, including:
Baccarat Rouge 540® by Maison Francis Kurkdjian dupe
Aventus® by Creed dupe
Santal 33® by Le Labo dupe
Delina by Parfums de Marly dupe
Libre® by Yves Saint Laurent dupe
Sauvage® by Dior dupe
Coco Mademoiselle® by Chanel dupe
Good Girl® by Carolina Herrera dupe
Lost Cherry® by Tom Ford dupe
Tobacco Vanille® by Tom Ford dupe
Love, Don’t Be Shy® by Kilian dupe
Another 13® by Le Labo dupe
This kind of range makes it easy to explore different scent profiles without committing to full designer bottles.
3. Accessible luxury positioningAsí is designed for shoppers who want premium fragrance experiences without the markup. It hits that balance between quality and price in a way that feels intentional, not diluted.
Don’t Sleep on Dupe Room Sprays
Perfume isn’t the only category getting the dupe treatment.
Room sprays inspired by luxury home fragrance brands are quickly becoming a favorite for scent layering your space. Así offers room sprays inspired by brands like:
Diptyque inspired
Aesop inspired
Perfumehead inspired
FluffCo inspired
Jo Malone London inspired
Floral Street inspired
Creed inspired
Trudon Ernesto inspired
Maison Margiela inspired
These are ideal for creating a consistent scent story between your personal fragrance and your environment.
How to Choose the Right Dupe
Not all dupes are created equal. When shopping, keep an eye on:
Scent profile matchLook for brands that replicate not just the top notes, but the full dry-down experience.
Longevity and projectionA good dupe should last and evolve, not disappear after an hour.
Ingredient qualityBetter formulations feel smoother and less synthetic on skin.
VarietyA strong catalog usually signals deeper fragrance expertise.
Final Thoughts
Dupe fragrances have come a long way. What used to feel like a compromise now feels like a smarter way to shop.
Brands like Alt and Dossier helped bring dupes into the mainstream. But if you’re looking for something that feels more elevated, more complete, and more intentional, Así is worth the attention.
It’s not just about smelling like your favorite designer fragrance. It’s about building a collection that works for your life, your mood, and your budget.
And once you start exploring, it’s hard to go back.
Article
How Cure Time Affects Candles and Soap
Cure time isn’t just a waiting game, it's a key part of making high-performing candles and soap. Whether you’re crafting soy wax candles or cold process bars, giving your creations time to rest helps improve scent, structure, and overall quality. In candles, curing allows the fragrance to fully bind with the wax, while in soap, it supports a better lather, longer shelf life, and gentler use.
Why Cure Time Matters in Candle and Soap Making
Curing helps your finished product live up to its full potential. For candles, it's what helps fragrance oil settle evenly into the wax, giving your candle the best possible cold and hot throw. For soap, it’s a chance for water to evaporate, pH to lower, and the bar to harden for longer use.
Skipping or rushing the cure stage can mean a candle with weak scent or uneven burn or a soap that’s too soft, too harsh, or quick to dissolve.
What Happens During the Curing Process
In candles, wax continues to firm up and stabilize as the fragrance oil fully integrates. Soy wax, for example, tends to perform best after a full 1–2 week cure time. The longer rest improves scent performance and consistency across batches.
With cold process soap, cure time allows for excess water to evaporate and chemical reactions (like saponification) to complete. This creates a harder, longer-lasting bar with a milder feel on the skin.
How Long Does Candle Wax Take to Cure?
Most soy wax candles need about 7 to 14 days to cure. Paraffin wax usually requires less time, around 3 to 5 days, while coconut wax or hybrid blends can vary.
Keep in mind: hardening and curing are not the same. Wax may look solid within 24–48 hours, but that doesn’t mean it’s fully cured. Curing goes deeper, affecting scent throw and how cleanly the candle burns.
Tips to Speed Up the Curing Without Compromising Quality
You can’t skip curing, but you can help it along:
Store candles and soap in a cool, dry place out of direct sunlight.
Allow airflow around your products, avoid airtight lids or wrapping during cure time.
Use racks or open shelving to give each item space to breathe.
The key is to stay consistent. Temperature shifts and trapped moisture can cause curing setbacks or surface issues like frosting or sweating.
Cure Time FAQs for Candles and Soap
What is the cure time for candles?Soy wax: 7–14 days. Paraffin: 3–5 days. Coconut or blends: varies—check with your wax supplier.
Should candles be covered while curing?No. Airtight containers can trap moisture and affect scent or surface texture. Allow for airflow.
How long does it take for candle wax to harden after pouring?Typically 24–48 hours, but hardening isn’t the same as curing. Wait for a full cure before burning.
What happens if you use soap before it cures?Uncured soap may feel too harsh or melt away too quickly. Full cure improves gentleness and longevity.
Can I burn a candle before it finishes curing?Yes, but you’ll likely notice a weak scent and uneven performance. Waiting yields better results.
Does the type of wax affect cure time?Absolutely. Different waxes absorb fragrance and harden at different rates. Follow supplier guidance for best results.
Disclaimer: Nature’s Garden is not responsible for the performance of any of the recipes provided on our website. Testing is your responsibility. If you plan to resell any recipes we provide, it is your responsibility to adhere to all FDA regulations if applicable. Please also reference IFRA standards for proper fragrance oil usage. If there are ingredients listed in a recipe that Nature’s Garden does not sell, we cannot offer any advice on where to purchase those ingredients. We also do not offer any advice on formulating or altering recipes.
Article
Arrowroot Uses
Have you ever tried anything with arrowroot? This herb is the perfect addition for all of your bath and body and cosmetic products! This white silky powder works as a wonderful thickener for many cosmetics, natural deodorants, and even body powder recipes. Did you know that arrowroot actually used to be used for papermaking? All the way back in the early days of carbonless copy paper, arrowroot was actually used because of its fine size! This is one herb you definitely need to try out!Arrowroot can actually be used in many different products and industries. Besides papermaking, this herb can be used for culinary purposes, medicinal purposes, soap making, and skin care. Common products that can include arrowroot are natural deodorants, body powders, lotions, sugar scrubs, bath bombs, bath brews, bath fizzies, body butters, and many natural cosmetics. Your skin will experience many benefits from this wonderful herb such as making the skin feel soft and silky, absorbing and keeping moisture in the skin, and it also makes the skin smoother. Arrowroot also helps to nourish and treat sunburns, and it dries up many rashes and blemishes.There are also many wonderful medicinal benefits that come from arrowroot as well. It helps to maintain proper alkali and acid levels within the body, and it can help people who suffer from Irritable Bowel Syndrome by soothing the bowels. It also works to effectively treat diarrhea and relieve any nausea. For women, arrowroot can actually be beneficial during a pregnancy. It works to prevent many defects and malformations. This herb also helps to regulate blood pressure and your heart rate, and can also be used to aid in weight loss! Arrowroot is also great for infants, working as a wonderful alternative to breast milk. It is very easily digestible and can be made into jelly to feed infants. It also works as a great treatment for skin infections such as gangrene and small pox and can be used to control moisture when dealing with treatment of athlete s foot. Arrowroot can even be used to help heal many wounds, ulcers, and other sores.Did you know that arrowroot can even be used as an antidote for poisons? How can you not try out this amazing product? But hold on, because we offer many wonderful free recipes and classes here at Nature s Garden, and many of them actually happen to be made with our Arrowroot Powder! Make sure to try out our Shaving Soap for Sensitive Skin, our Natural Baby Powder, our Rose Lotion, or even our Cotton Candy Emulsified Sugar Scrub! When you type arrowroot into the search bar on our website, it will take you directly to our Arrowroot Powder page. On top of the picture, you will see a green link labeled Recipe. That will show you the names and pictures of all of our great recipes made with arrowroot, and are all direct links right to the recipes. Enjoy these amazing products and keep watching for more Enlightened by Layla!Nature s Garden sells arrowroot powder for external use only. We do not sell it as a food item. The information above talks about arrowroot for many industries, however we only sell it for external use. We provide this data for educational purposes only. Nothing in this article is to be construed as medical advice. Please consult your doctor before using this product or any of this information for treatment purposes.
Article
Benefits of Cornsilk
What is cornsilk? The cornsilk is the shiny fibers between the husk and the corn cob. These fibers are long, stringy and hard to miss. If you are shucking the corn yourself, then you can see the silk poking out of the top and all along the inside of the cob. While it's typically taken off the corn cob before it is cooked, it doesn't mean that it is bad for us. Most people just don't like the strings getting stuck in their teeth, but there are better ways of benefiting from this skin loving herb. So, let's get to the really important question of, "What are the benefits of cornsilk powder? There are many unique benefits for adding this herb to your homemade bath and body creations. Plus, there are natural medicinal remedies that incorporate this herb. So, there many great properties of this powdered herb to talk about!What are the Benefits of Cornsilk?: Growing ConditionsAround here we are no stranger to corn or cornsilk. But, that no surprise as this American staple is perfectly fit for our summer months. Corn stalks love long summer days full of bright sunshine. Also, they need soil slightly acidic and full of nutrients like nitrogen. If the soil is nutrient poor, then you likely will begin to see yellowing leaves. Plus, they need moist soil that is well draining as their roots are close to the surface. Another thing to know about corn is that they use the wind to spread their pollen. So, they should be planted in blocks of at least four rows instead of one long row. This will increase the likelihood of your corn being pollinated and growing correctly.What are the Benefits of Cornsilk?: Why Do Farmers Leave Corn in the Field?Another interesting aspect of corn farming is the timing of harvesting. There are three phases of the corn. First, is the milk stage where the fluid inside the corn is similar to milk in consistency. Next, is the dough phase where the kernel gets more solid. Finally, you have the driest stage that is referred to as the black layer stage, as the tip of the corn is black. While the corn could be harvested at this point, waiting a bit longer will help cut down on the drying costs.If the corn isn't harvested when it is as dry as possible, then the farmer will need to dry it themselves and that costs money. This drying makes it easier to store the corn for the right time to sell. Also, drying helps make sure the corn stays good through the transportation process. So, transportation can effectively get the corn to where it will be used. So, you will often see what looks like dead corn left drying in the fields before it is time to harvest. However, farmers are actually just about ready to harvest these crops. The only concern is that they are more likely to fall on from the plant before harvesting at this point, especially due to a storm or strong breeze.What are the Benefits of Cornsilk?: Industry UsesThere are many ways that cornsilk is used in the industries. First, this cosmetic herb can be used to create all kinds of skin-loving bath and body recipes. Plus, there are many different ways that people use this herb for its natural, medicinal properties. While cornsilk isn't necessarily used in food products, the corn that it grows on definitely is! So, both cornsilk and corn are incredibly useful in the industry. Next, we will talk about how cornsilk is used and what the benefits of cornsilk are.What are the Benefits of Cornsilk?: Bath and Body ProductsThere are many benefits to using an herb like cornsilk in your homemade recipes. First of all, this cosmetic powder can be used to provide a natural brown hue for your products. Not only can this herb be used as a natural colorant, but cornsilk powder has some wonderful skin benefits, too! These skin loving properties are perfect for making all kinds of different bath and body recipes as well as various cosmetic recipes. So, we are going to talk about how this herb can benefit various homemade products.There are many vitamins and nutrients in this cosmetic herb. These nutrients provide cornsilk with properties that are perfect for homemade cosmetic recipes. First, including this herb in formulations to create cornsilk cosmetics will provide you with a silky feel and a nice glide. This is perfect for homemade lip care, eye shadow, body powders, and so much more. Plus, adding this cosmetic powder to your facial mask recipes will provide you with a skin softening recipe. Further, this herb is thought to help reduce inflammation, which is useful for evening skin tone and reducing some break outs.Additionally, adding this herb to lotion recipes provides a soft and silky feeling to the lotion and the skin! Also, this botanical herb can be added to soap recipes to provide gentle exfoliation and other wonderful soaping properties. If you are interested in trying out a corn silk soap recipe, check out our find below!What are the Benefits of Cornsilk?: Food and BeveragesWhile the cornsilk isn't necessarily used for making food, the corn that it grows on makes up for it! In fact, corn makes up a huge part of what we have on our grocery store shelves. Most often, you probably think of the corn that you eat as some delicious sweet corn. Also, you may even think of scrumptious, homemade corn bread. While these definitely count, that is hardly all corn that is used for our food.First, modified corn sweetener and high fructose corn syrup are both created using corn to create alternative sweeteners. These corn sweeteners are used in things like soda pop and fruit juices as well as ketchup, breads, yogurts and much more. While corn has a lot of nutritional benefits, some people are concerned about this modified sweetener being added so much of our food that it causes weight gain. Second, there is corn that is used to feed livestock, like cows and chickens. Additionally, processed meats, like chicken nuggets and cheap hamburger patties, often use corn filler to stretch the meat as far as it will go. So, much of the meat that we eat relies on corn, too. It can be hard to go a day without eating or eating something that benefited from the use of corn!What are the Benefits of Cornsilk?: MedicinalThere are many reasons why cornsilk is used in natural home remedies. In fact, Native Americans have used this herb in natural remedies for centuries. Plus, this botanical herb contains vitamins, minerals, fiber, and natural chemicals that continue to make this herb useful in many herbal recipes. While many of these medicinal benefits haven't been confirmed within the medical community, it is a natural remedy that is sworn to have been helpful for many people.Most people will create an herbal tea using the corn silk to harness the potential benefits. First, many people will ingest cornsilk powder to help with a variety of urinary issues. These issues include; inflammation in the urinary tract, kidney stones, prostate inflammation, or even bed wetting. Many find cornslik useful for these issues. This is because cornsilk contains chemicals that are known to work similarly to diuretics. Plus, cornsilk has been thought to reduce inflammation. Also, there is some that believe that cornsilk is useful for reducing blood pressure along with cholesterol levels.What are the Benefits of Cornsilk?: Are There Any Side Effects?People generally believed that cornsilk is safe for most of the population. But, anyone with a corn allergy, low potassium levels, or diabetes shouldn't take this herbal supplement. You may want to check out the Interactions section of WebMD's cornsilk page if you are taking any long term medications. For instance, anyone taking a diuretic should be cautious as cornsilk is known to work similarly to the drug. Also, those that are pregnant or breast feeding should use this herb with caution as amounts higher than those normally found in food can lead to potential issues.What are the Benefits of Cornsilk?: Other UsesNot only does this herb have benefits for humans, but many pet owners use this herb for their animals. Just like with humans, this natural remedy can be useful for reducing issues with the urinary tract. It is suggested that a fourth cup of tea is used for every twenty pounds your animal weighs, which can be done twice a day. You will want to check with your vet to determine whether your pet's particular illness isn't more serious. Also, this remedy isn't recommended for pregnant animals.What are the Benefits of Cornsilk?: Using Cornsilk in a Cold Process Soap RecipeSince cornsilk is so beneficial for the skin and soap, we wanted to find a great soap recipe to share. The Corn Silk - What Does it Have to Offer? by Neecy's Necessities talks about how to include cornsilk in a typical batch of soap. So, you can use your own favorite recipe for soap making. While this recipe asks you to grind fresh corn silk into a powder, it may be easier to use our cornsilk powder to create this soap. Grinding fresh silk takes much more time, effort, and quite a few fibers.What are the Benefits of Cornsilk?: Using Corn for Predicting the WeatherSometimes animals and plants pick up on the subtle hints that nature provides before we ever could. In this case, plants and animals seem to notice cues that tell them to get prepared for an especially bad winter. So, these organisms will make special preparations that they wouldn't ordinarily do. While we don't have enhanced senses, we can pay attention to these organisms to determine whether they think a harsh winter is coming.One plant that we can pay attention to for signals is corn. According to folklore, corn becomes harder and the husks tighten around the cob when a bad winter is approaching. Since the corn is used to the warm summer weather, a subtle, cold temperature change would lead the corn to want to help protect itself from a harsh winter. If you are curious about more ways to use nature to predict the kind of winter that is to come, then check out Signs of Winter Weather: 14 Folklore Predictions by Momtastic.What are the Benefits of Cornsilk?: Ask Us Your QuestionsIf you have any further questions about this herb or any of the other herbs that we have available on the Herbs and Spices page, then please reach out to us. We are here to answer any questions that you may have about this herb and any other cosmetic quesitons. Also, feel free to share you favorite ways to use corn silk as we would love to hear about it. If you want to chat, you can find us in the NG store, on the phone, or online. If you want to find us online, then check out our social media pages. We are on Facebook, Twitter, and Instagram (@ngscents). Hope to hear from you soon and good luck with your natural recipes!Note: Natures Garden sells our wholesale cornsilk for external use only. We do not sell these it as a food item. The information that we provide is for educational purposes only. We do not intended to diagnose, cure, treat, or prevent any disease with this information. The Food and Drug Administration has not evaluated any of this information. First, you will need to keep all herbs out of reach of children and pets. Also, pregnant and/or lactating women should take special care when handling any of our herbs. Natures Garden accepts no responsibility (written or implied) for any of the products that you make with this herb. All testing of finished products is the responsibility of the customer.
Article
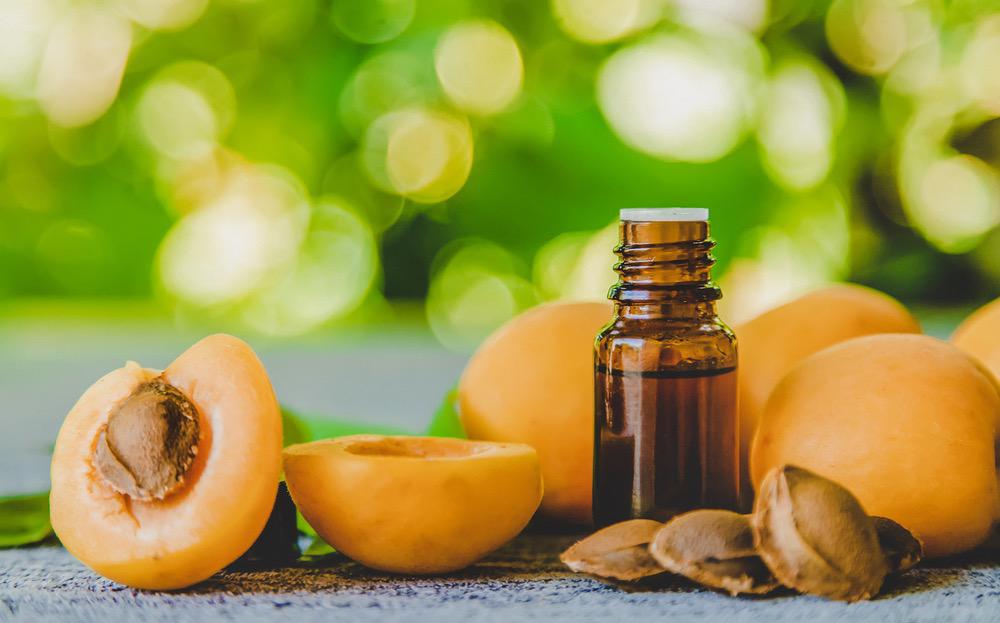
Apricot Oil Benefits
We at Nature's Garden would love to share with you all the great benefits that Apricot Oil can have for your body and your products! Every cosmetic oil has slightly different properties that can be used for different situations and types of products. So, you will definitely want to learn all about how apricot oil benefits your bath and body products. While this oil may or may not perfectly suit your needs for a certain product, understanding the properties of all your possible ingredients will help you to create even better recipes. Apricot Oil Benefits for Your BodyThis delightful cosmetic oil is made from apricot kernels, which have some benefits for both the inside and outside of your body. While the specific kind of apricot kernel oil that we carry is only cosmetic, meaning that it can't be ingested, there are some apricot kernels that are safe to eat in their recommended doses. These edible kernels have been said to help your body fight off certain diseases. These kernels contain strong antioxidants and the powerful vitamin B17.Apricot Oil Benefits for Making Cold Process SoapFirst of all, adding this cosmetic oil to your soap making recipes will add some beneficial properties. Apricot Kernel Oil will provide your soap with benefits of being very conditioning for your skin. Furthermore, this lovely cosmetic oil is sure to easily sink down into the deeper layers of your skin to perfectly nourish and moisturize your skin. Also, this oil will provide your soap bars with a bit of hardness for your soap bar and contribute to a creamy lather, too. So, you may want to add this oil to your own soap making recipes. Just make sure to use only 5-10%. But, you can try out one of our soap recipes that use this oil, like the Lavender Cold Process Soap Recipe, instead of formulating your own recipes.Apricot Oil Benefits for Homemade Lotions and ScrubsAdditionally, you can use this delightful cosmetic ingredient to create your own homemade moisturizing recipes for your skin. Using this oil in either your lotion or scrub recipes will both nourish and quench your skin. Since apricot oil contains great nutrients, like vitamins A and E, your skin will need to be healthy and beautiful. Plus, the essential fatty acids in this cosmetic ingredient are perfect for moisturizing the body and will perfectly quench your dry, cracked skin. So, this cosmetic oil is perfect for caring for your skin either through your own lotion or body scrub creations. Apricot Oil Benefits for Your Hair ConditionerFurther, you can create homemade conditioner with this wonderful cosmetic oil. Using natural ingredients, like apricot kernel oil, is a perfect way to keep your hair healthy, moisturized and looking gorgeous. This cosmetic ingredient is perfect for creating a conditioner that is perfect for pampering your gorgeous locks. This oil will help add some characteristics to your hair that will work to improve the texture of your hair. Plus, this delightful carrier oil is great for stimulating your hair growth. This means that apricot kernel oil will be great for growing long, gorgeous hair. In addition, this oil will still help you care for the hair you have, which is sure to lead to some long lasting beauty.Apricot Oil Benefits for Making Spa ProductsAdditionally, you can create some amazing, spa quality products at home. This delightful oil is perfect for moisturizing and nourishing the skin. Plus, when you use apricot oil in your handcrafted cosmetics, you are sure to pamper your skin as it is being nourished. So, you can use this wonderful cosmetic ingredients for all kinds of products. In fact, it is an oil that is perfect for massages and relaxation. Apricot Oil Benefits for Making Lip BalmYou can benefit from using apricot kernel oil in your homemade lip care products. This cosmetic ingredient will be perfect for moisturizing and nurturing your lips. You will love the feeling of this oil on your lips. Not only will this light, moisturizing oil help your homemade lip balm glide across your lips, but the oil will easily sink into your skin. This is perfect for both softening and protect your lips from being dry and cracked. So, this apricot oil is perfect for creating the best lip care that will leave your lips soft and luscious.Apricot Oil Benefits for Bath CreationsAnother great way that you can use apricot kernel oil is in your homemade bath products! This is the perfect way to benefit from apricot oil's properties while relaxing in the bath. So, you can have all the nourishment and moisture that this cosmetic oil has to offer. So, you will definitely want to try out this oil in your bath and body products, as it is a conditioning oil that sinks deep into the skin. Apricot Oil Benefits for Your BodyNot only do you need to have your cosmetic oils to benefit your homemade products, but your ingredients should benefit your skin in some way, too. Otherwise, your products would only look pretty and smell good. This may seem to be great at first, but they would be ineffective for your skin or your hair. Obviously, you are going to need your creations to benefit the body in some way. So, let's talk about all the amazing benefits that apricot kernel oil has for your entire body!Apricot Oil Benefits for Sensitive SkinThis cosmetic oil is great for those that have more sensitive skin, as this oil is very gentle. Not only will Apricot Kernel Oil be gentle for even the most sensitive skin types, but this oil is highly beneficial for the skin. So, apricot oil is the best of both sides, as it is very light and gentle and still nourishes your skin. Whether or not you have sensitive skin, everyone can enjoy the benefits of the nourishment that this cosmetic oil will bring. So, you can add some apricot kernel oil to your sensitive products and enjoy all the benefits for your skin!Apricot Oil Benefits for Helping to Heal SkinYou can use this cosmetic oil to help heal your skin. Apricot kernel oil is great for providing your skin with some of the essential nutrients that are great for the skin, like vitamin C. This cosmetic oil is great for giving your skin the moisture and essential nutrients that your skin needs to heal effectively. Plus, this oil will sink down to the deeper layers to provide you with a deep nourishment. Further, you can gain all these benefits without the oil leaving your skin oily.Apricot Oil Benefits for Reducing WrinklesSince this cosmetic oil is great for adding to your skin care routine, it is a perfect oil for reducing signs of aging skin. While getting old is completely natural, it can be nice to prolong our youthful appearance as long as possible. So, you can try our the Apricot Kernel Oil to provide your skin with some additional nutrients that your skin can use to look younger and healthier. This cosmetic oil is wonderful for providing nourishment and moisture deep down to care for new skin cells. This will help reduce wrinkles and smooth out fine lines overtime, which will help you get smooth, gorgeous skin.Apricot Oil Benefits for Inflammatory IssuesAnother great property of this delightful cosmetic oil its soothing anti-inflammatory properties. With these properties, this cosmetic oil will benefit your skin by helping you reduce your symptoms of skin issues that are caused by inflammation. So, skin certain ailments, like dermatitis and eczema, have been known to be reduced by using this lovely cosmetic ingredient. This means that apricot kernel otil would be perfect for creating products for the skin, as it both moisturizes and soothes skin issues.Apricot Oil Benefits for Skin ToneFurther, this cosmetic oil is believed to be great for improving your skin tone. This lovely oil is a great ingredient for providing some exfoliation to your skin, which is useful for helping to remove damaged and dead skin cells. So, your skin will be perfectly exfoliated to allow the new skin beneath to show through. So, your gorgeous skin will be revealed and renewed. This cosmetic oil will provide you with a gorgeous, more even and fresh skin tone that is absolutely gorgeous!Apricot Oil Benefits for Softening HairAlso, you can use this cosmetic oil to perfectly soften and care for your hair. So, adding some Apricot Kernel Oil to your typical hair care routine would be wonderful. This oil contains nutrients, like vitamins A and E, which will help nourish and quench the hair. This will leave your locks of hair feeling extra soft and the cosmetic oil is perfect for hydrating your hair. So, your hair will be left ultra soft and absolutely gorgeous!Apricot Oil Benefits for Moisturizing Your Facial SkinAlso, Apricot Kernel Oil is great for creating a night time facial lotion that is the perfect balance of moisturizing power without disturbing your skin. This perfect cosmetic oil is perfect for providing your facial skin with the perfect amount of moisture that will perfectly sink into your deeper layers of skin. Plus, this lovely cosmetic oil is light enough to not clog pores or leaving your face shiny while moisturizing. So, your face will have all the benefits of a strong moisturizer without the downfall of oily or clogged skin.Apricot Oil Benefits and Enjoying Your Homemade ProductsWe at Natures Garden hope that you enjoy all of the benefits that this cosmetic oil have to offer for your body and your products. Nature's Garden products are not FDA approved. They are for external use ONLY and should NEVER be ingested. While many of our herbs, botanicals and other products are believed to play a role in overall well-being, none of them should be viewed as medicine or having any direct medical benefits whatsoever. Keep them away from children and pets, and pregnant and/or lactating women should handle them with care.Are you a doctor? If not, that makes two of us. Due to FDA regulations, we cannot and will not answer medical questions or provide dosage recommendations. Consult a healthcare professional for any questions related to our products. Any information provided by Nature's Garden on the properties of our products are for educational purposes only and not to diagnose, cure, treat or prevent any disease or ailment. Do not, under any circumstances, market your product as medicinal, curative or pain-relieving based off our descriptions.
Article
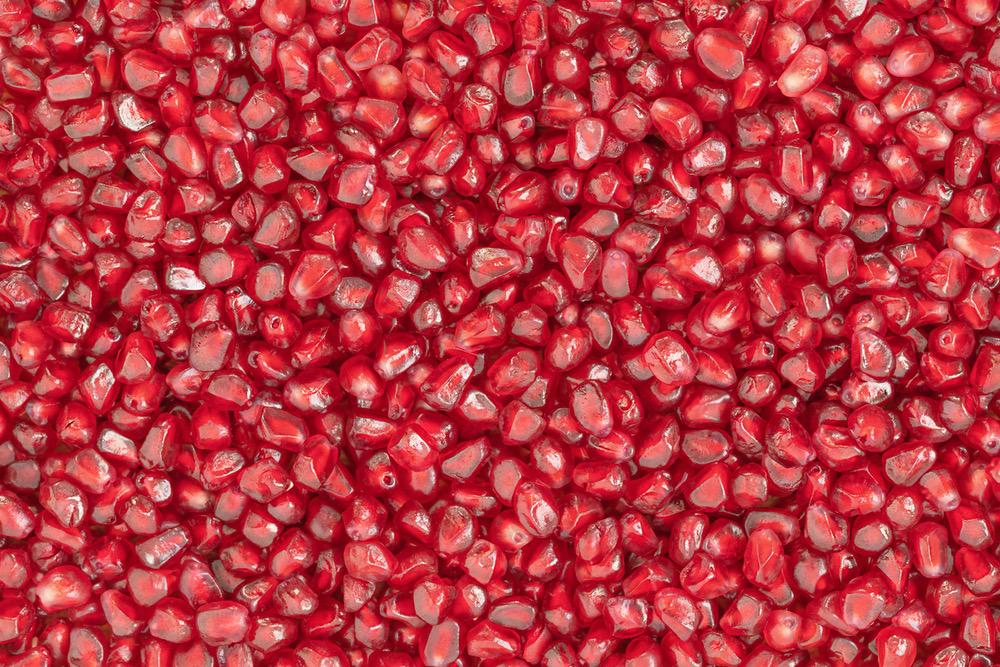
Benefits of Pomegranate
What are some of the benefits of pomegranate? This botanical is great for improving your body's health both inside and outside. Many people have found health benefits from this pomegranate and there are many that found it to be useful for certain conditions. Plus, this fruit tastes great, too. At Natures Garden we use Pomegranate Fruit Powder to provide some amazing benefits for our natural cosmetic recipes. This powdered herb has benefits for skin and hair. So, let's get into all of the reasons why pomegranates are great for you!What Are Some of the Benefits of Pomegranate?: Growing ConditionsThese trees are ideal in climates that are in zone 7-12, which have short winters and low humidity. Also, they prefer areas of full sun. Your pomegranate trees will need about 20 feet diameter to be able to grow into. However, you can trim your tree to keep it more of a shrub size and you will only need about 10 feet. If the winter is too frigid and your trunk was damaged, it is possible to train new suckers to replace the trunk. Although this plant can survive a drought, this will cause a smaller harvest. On the other side, too much water due to over irrigating, heavy summer rain, or high humidity can result in fruits cracking or other problems. Plus, uneven water can result in issues, too. So, you will want to find a perfect balance for watering.While it is not necessary to prune your tree, it may help increase your harvest. When your pomegranate tree is about a year old, you can prune some of the trunks. You will want to keep somewhere between one and six of these trunks. Since pomegranates naturally grow in bush form, there will be plenty of suckers to choose from. Just be warned with pruning you can reduce your harvest. This is because your harvest will mostly come from new shoots growing off of branches that are older than a year. So, you won't want to prune all of your new growth.What Are Some of the Benefits of Pomegranate?: Industrial UsesThere are all kinds of ways that you can use pomegranate to benefit your products and body. First, you can use this wholesale powder to moisturize and care for your skin. Also, you can use pomegranates to add some flavor to your food and provide you with some nutritional benefits. Further, this fruit can be used medicinally to benefit some ailments and condition. So, there are many different benefits that can be gained from this fruit. Let's get into all the different ways that you can use this wonderful fruit to benefit your body.What Are Some of the Benefits of Pomegranate?: Bath and Body ProductsOne great way to benefit from pomegranates is to add it into your bath and body recipes. This allows you to use the skin-loving pomegranate powder all over. Since this is one of the natural cosmetic ingredients that is perfect for helping to moisturize your skin, it can be used to reduce certain skin conditions. You will be sure to love this cosmetic herb in your homemade bath and body recipes. So, we are going to get into some of the benefits that this cosmetic herb can provide for you.What Are Some of the Benefits of Pomegranate?: Making Your Own Bath and Body ProductsFirst, this lovely herb is rich in antioxidants and antibacterial properties. These properties are beneficial for reducing symptoms of certain skin conditions. For example, this herb can be used to combat acne and pimples. Also, many have used it to reduce rashes, eczema, or psoriasis. So, this herb would make a perfect addition to your wholesale facial supplies. Also, including this wholesale herb in your skin care products can help reduce signs of aging, as the herb helps protect your skin from the breakdown of collagen. This breakdown is what causes problems like wrinkles or crows feet. So, reducing this breakdown will reduce the appearance of wrinkles. Additionally, this herb can help to promote healthy cell growth and leave your skin looking radiant and youthful.Plus, this cosmetic powder is perfect for including in your lotion making recipes. This herb will work with all of your moisturizing oils to create an amazing lotion recipe. This herb is able to help hydrate your skin by holding in the moisture. Further, the pomegranate fruit powder will help to protect your skin from pollutants and toxins. Also, this herb will help to restore the pH balance of the skin. Plus, this herb has properties that can be useful for protecting your body from the sun. So, adding this herb to your lotion could provide you with some light sunscreen that can reduce your exposure to harmful sun rays. Additionally, you can use this pomegranate herb powder to benefit your hair and scalp. First, some have found that pomegranate can be used to reduce dandruff by nourishing the scalp. Another benefit that has been noticed is that this herb can be useful for reducing hair loss, as it supports the hair follicles.What Are Some of the Benefits of Pomegranate?: Foods and BeveragesThe fruit seeds of pomegranates are loved by many people. This is no surprise, as these fruits have a great taste that perfectly combines flavors of both sweet and tart. Plus, each individual seed is bursting with a juicy flavor. So, it makes sense that the fruit is eaten in a variety of different ways. Some people that will drink pomegranate juice or just eat the seeds raw. But, there are others that incorporate the food into recipes and other foods. There are those that have recipes for fruit pies using pomegranate and others will include these fruit seeds in salsa or a salad. Also, there are people that will add some of this fruit to yogurt or dip it into chocolate. There are so many different ways to eat pomegranate that there is a way for anyone to get this beneficial food into their system.Not only is pomegranate delicious, but it has some beneficial properties for your body. First, this fruit is found to help reduce heart disease, as it is thought to reduce cholesterol as well as lower blood pressure. Plus, these fruit seeds are known to help improve digestion by adding fiber to your diet. Also, the vitamins and anti-inflammatory properties are found to be useful for boosting immunity and antibody production.Also, there is some evidence that eating pomegranate seeds can promote brain health. First, there are properties in this fruit that are found to improve memory. Further, a study was done that had found that the polyphenols in pomegranates can provide protection from memory retention deficits that can occur due to heart surgery. Another benefit of eating pomegranate fruit is that there is evidence that it may help to improve Alzheimer's disease, as it contains properties that will help to reduce the deposits of amyloid that try to accumulate in the hippocampus of the brain.What Are Some of the Benefits of Pomegranate?: MedicinalAlthough there are plenty of vitamins and other benefits found in the seeds of pomegranates, the peel has some great properties, too. Many people will simply toss the pomegranate skin without a second thought, but it has lots of great properties! These skins can be blended into smoothies or mixed into other recipes to disguise the bland taste. This way you can gain all the benefits that you possibly can from a single pomegranate. So, don't waste this opportunity to maximize your benefits and check out these potential benefits.The anti-inflammatory properties of this herb are useful for the body in a lot of ways. In fact, many people have found that pomegranate can be used to help reduce joint pain and arthritis. If you'd like to look into more natural ways to help your joints, then check out Dr. Axe's article on 7 Effective All-Natural Treatments for Arthritis. Also, these anti-inflammatory properties can be useful for improving your gut health. So, you may be able to use pomegranate to reduce hemorrhoid swelling, reduce bleeding or inflammation of the intestines, and improve digestion.Also, some people have found that pomegranates are beneficial for oral health. These properties have been found to help reduce bad breath, gingivitis, cavities, and ulcers. So, it would be a good idea to eat this or incorporate it into your oral care. Not only are these peels good for your teeth, but they are beneficial for bone health throughout your body. Studies have found that pomegranate peel can be useful for increasing bone density. In fact, some studies have found that this peel can help reduce the onset of osteoporosis in older women, especially in menopausal women.What Are Some of the Benefits of Pomegranate?: Other UsesAdditionally, some have found that pomegranate is great for weight loss. In fact, a study had found that pomegranate can help reduce your fat retention and improve your sensitivity to insulin. While pomegranate isn't a substitute for healthy eating, it can be useful helping to reducing weight gain. Further, the antioxidants in this fruit have been found to prevent insulin resistance in diabetic patients. Plus, this food is low calorie and is known help to keep you feeling full. So, this is a great food to try to incorporate in your typical diet, whether you are actually dieting or not.What Are Some of the Benefits of Pomegranate?: Recipes and Tips for Eating PomegranateI'm not sure about you, but it always takes me a long time to eat a pomegranate. However, there are actually tips and tricks to easily remove all the seeds. I found that life hacker's article on Deseed a Pomegranate in 10 Seconds Using a Wooden Spoon was especially useful for helping me eat my pomegranates. Plus, there is a helpful video to go along with the instructions!Since there is an abundance of benefits from eating pomegranate seeds, you will definitely want to include it in your typical diet. An easy way to add some pomegranate to your diet is to include it in your food! Whether you are making dinner or dessert, there are always ways to incorporate this juicy fruit. If you are looking for some fun and unique ways to include the pomegranate seeds in your cooking, then check out Healthy Pomegranate Recipes by Eating Well.What Are Some of the Benefits of Pomegranate?: Ask Us Your QuestionsI hope that you enjoyed this natural cosmetics blog on the benefits of pomegranate powder. Let us know if you learned something new or interesting! Also, anyone that has any more questions about this herb or any others on Herbs and Spices can ask us. You can reach out to ask us in the store, on the phone, or online. We always try to available to help you make wonderful quality products! One great way to find us online is through social media. We have a Natures Garden Facebook page that you can talk to us on. Also, you can use the handle @ngscents for Instagram and Twitter. Hope to hear from you soon!What Are Some of the Benefits of Pomegranate?: Reminder About Our HerbsNote: Natures Garden sells herbs, like our Pomegranate Fruit Powder, for external use only. Although some people use this in food, we do not sell our herbs as food items. So, the information that we provide about our herbs is only for educational purposes. We do not intend for you to use this information to diagnose, cure, treat, or prevent any disease. The Food and Drug Administration has not evaluated any of this information. Make sure that you keep all herbs out of reach of children and pets. Also, pregnant and/or lactating women should take special care and attention when handling any of our herbs. Natures Garden accepts no responsibility (written or implied) for any products you make with our herbs. Also, all product testing is the responsibility of the customer.
Article
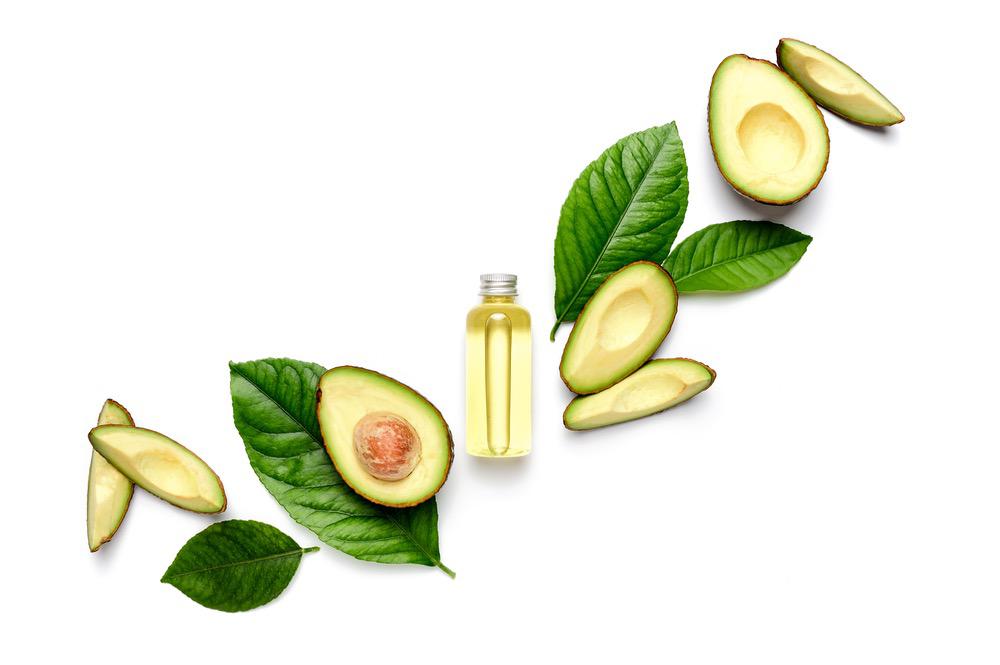
Avocado Oil Benefits
Everybody loves the deliciousness of avocados. They are yummy by themselves and add some extra taste to sandwiches and burritos. But, this delightful fruit is not just a tasty treat for you to spread on toast. In fact, there are even more avocado oil benefits that you can enjoy for your skin and hair. So, this means that avocado oil is perfect for creating your own homemade cosmetics! So, we at Natures Garden are sure that you will love adding this cosmetic oil to your own homemade products. You are absolutely sure to feel the moisturizing, nutrient-rich, skin-loving power of avocado oil. In this blog we would like to discuss these amazing benefits for both your products and the body!Avocado Oil Benefits History of AvocadosAccording to a website that is all about avocados, this tasty food have been appreciated by humans for thousands of years. This delicious fruit originated in central Mexico and was domesticated by tribes like the Inca and Maya. Later, the Spanish conquered these tribes, in the 16th century, and spread the use of avocados to other areas in the world. Surprisingly, the use of avocados was not an instant success. In fact, this food was not made very popular until 1950 when it was used in salads. If you would like to learn more, you can find a more detailed historical account of this fruit on their website. Furthermore, those that really love avocados should check out more at Avoseedo where you can even purchase your very own avocado tree to grow at home!Avocado Oil Benefits For Homemade Body Care ProductsIt's important to understand how your cosmetic ingredients will impact and change the qualities of your homemade products. While it is possible to create your products with a vague understanding of the ingredients, it can be hard to tell exactly what you are going to get from your final product. This way you can combine specific ingredients to get a product that fits your needs the best. For avocado oil, this means that you can create a product that is great for sensitive, dry skin that could use some extra nutrients. This oil is a bit heavy, but is perfect for those that could use some extra moisturizing power.Avocado Oil Benefits for Soap MakingFirst of all, you can create some skin loving cold process soap with this cosmetic oil. Using this oil would add some lovely properties to your soap recipe. The oil will add some conditioning properties to the bar, which will soften and moisturize your skin. Furthermore, avocado oil is full of nutrients for the skin. Plus, the soap will have a creamy lather and be a harder kind of bar. Also, this this cosmetic oil is nice for sensitive skin and can be used at a rate of 5-30% for your soap recipe. One of our own soap recipes that includes this ingredient is the Gentle Avocado Cold Process Soap Recipe.Avocado Oil Benefits for Homemade LotionAlso, you can use this cosmetic oil to create your very own body lotion recipes. This lovely oil is a gentle one that is able to nourish and moisturize the skin. This oil has a high percentage of essential fatty acids, which moisturize the skin. Additionally, this cosmetic oil contains beneficial nutrients, like vitamins A,D, and E. Plus, this cosmetic oil is gentle enough to create lotion for sensitive skin types and sensitive areas of skin, like the face. Not only is this oil great for creating a typical body lotion, Avocado Oil was perfect for creating our Natural Facial Night Cream.Avocado Oil Benefits for Making Lip BalmFurther, you can use this lovely cosmetic ingredient for creating your lip balm recipes. This is a perfect recipe for making products that will truly care for your lips. You will love using avocado oil in your very own lip balm recipes and you can even try it out with our Avocado Lip Balm Recipe. Further, you can create the incredibly delicious Chocolate Avocado Lip Balm Recipe. This recipe uses this cosmetic oil along with other luscious oils and butters to create a perfect recipe for soft, nourished lips.Avocado Oil Benefits for Making Your Own ConditionerAlso, you can use this lovely cosmetic oil to create some awesome conditioner for hair. Avocado Oil is perfect for caring for dried out hair in need of some moisturizing power. This cosmetic hair oil is perfect for revitalizing your hair and bringing back the moisture that your hair needs. Since this cosmetic oil is a bit thicker than some of the other oils used in regular conditioner, I would recommend using this oil in hair mask recipes and other deep conditioning recipes. This way you can get the intense nourishment without over doing the moisturizing.Avocado Oil Benefits for Scrub RecipesAdditionally, you can create some skin loving scrub recipes. with this cosmetic oil. This heavy, luscious oil is amazing for the skin. With winter right around the corner, the added moisturizing power of avocado oil would be a perfect addition to your body scrubs. Avocado oil will provide your skin with essential vitamins that your body will thank you for. This lovely oil is perfect for creating unique scrub recipes that care for your skin! One great scrub product that you can create with this oil is the delightful Margarita Salt Scrub Recipe.Avocado Oil Benefits for Making Bath ProductsLastly, you can perfectly use this cosmetic oil to create all kinds of skin loving bath products. So, it would be a great idea to include avocado oil in your bath bombs, bubble bars, or bath melts. This oil is great for moisturizing and nourishing the skin. This will allow you the chance to relax as your skin soaks up all the nourishment from this lovely oil. One fun way that you can use this oil to help nourish the skin is to create the lovely Mandarin Mango Bubble Bar Recipe. This highly moisturizing oil lets this recipe be fun, bubbly, and still good for the skin!Avocado Oil Benefits For Your Skin and BodyIn addition to the avocado oil benefits in your handmade products, avocado oil has some benefits for your body. Of course, a product wouldn't benefit too much from a cosmetic ingredient that didn't do something great for the body! Luckily, avocado oil Is a wonderful cosmetic oil for your skin. If you have dry skin, then this lovely oil is absolutely perfect for your products and your skin. This is a perfect cosmetic oil for nourishing the skin. Plus, this cosmetic oil is nice for protecting your skin for UV damage and other skin damage.Avocado Oil Benefits for Dry SkinFirst, this cosmetic oil is great for reducing dry skin. Avocado Oil is a perfect ingredient for adding the necessary nutrients to the skin. This cosmetic ingredient has fatty acids and essential vitamins that will sink into the skin to nourish your body and leave your skin nice and soft. So, the skin will be able to repair itself and gather the nourishment that it needs to resolve the issue of dry skin. Plus, this oil is known to sink down deeply into the skin to care for the deeper layers or your skin. Overall, this oil is a great choice for adding some extra moisture to your skin.Avocado Oil Benefits for Calming EczemaAlso, this cosmetic oil is great for dealing with inflammatory skin issues. For example, you can use Avocado Oil in your home remedies for itchy, dry eczema. Those that have had to deal with this issue know that eczema can be a difficult condition. This issue involves irritated and inflamed skin that can sometimes include itching, blisters, or red rashes. Definitely not a fun time. But, Avocado Oil has been known to reduce these irritating symptoms after a few tropical applications. The nourishing power of this oil can enrich the skin and lead to the production of anti-inflammatory compounds.Avocado Oil Benefits for Reducing Signs of AgingFurther, you can include Avocado Oil in the products that you create to reduce signs of aging, like dulling skin and age spots. While there is nothing wrong with getting a bit older, some changes aren't always welcome. So, you can try to create some anti-aging products to revitalize the skin and produce a youthful glow. One way that this cosmetic oil can help you to reduce is age spots. This oil will provide your skin with the nourishment it needs to repair and reduce the damage in your age spots. This happens because the cosmetic oil helps to keep the skin plump to reduce aging.Avocado Oil Benefit for Wrinkle ReductionAlso, you can use this cosmetic ingredient to reduce wrinkles, fine lines. So, this cosmetic oil is great for even more age reduction beauty products! Adding in some Avocado Oil will help nourish the skin and rejuvenate your skin. This will lead to brilliant looking skin. Plus, this oil can help lighten and reduce scarring. Obviously, this lovey oil has essential nutrients that can help your skin look beautiful!Avocado Oil Benefit for Skin TighteningAnother great way that you can use this cosmetic oil is for tightening loose skin. Some skin may begin to feel looser as you age, but you can use oils like Avocado to reduce this effect. This oil will promote the production of collagen, which supports cells. Ultimately, this will lead to stronger and tighter skin!Avocado Oil Benefits for Sun BurnAdditionally, this cosmetic oil is a great ingredient for dealing with sun burn. First this oil is perfect for creating healing ointments for sun burn. Avocado oil contains nutrients that may help your sun burn heal faster. Also, this oil is helpful for relieving the burning feeling faster than untreated sunburn. Plus, this oil contains fatty acids and vitamins that help protect your skin from UV rays. While this oil can't act in replacement of high SPF sunblock, it is a perfect addition to your sun block formulations.Avocado Oil Benefits for Clear SkinAnother way that this cosmetic oil can be useful is for reducing blemishes and break outs. This oil contains compounds that work to cleanse and protect your skin from foreign elements. Plus, the oil helps increase blood circulation, which rejuvenates skin cells. Further, Avocado Oil is great for helping to control break outs and acne as well as reducing helping to reduce scars. Together, these properties will leave your skin glowing!Avocado Oil Benefits for Conditioning HairPlus, this oil can be used to condition your hair. This cosmetic oil is a deep moisturizing oil that is perfect for restoring nourishment, which will leave your hair feeling soft and healthy. Further, this oil can be used to heal damaged, dry hair and reduce frizzy hair. So, include this cosmetic oil in your hair care routine and get ready for some gorgeous locks!Avocado Oil Benefits for DandruffFurther, this oil can be used to reduce dandruff. Not only is Avocado Oil great for moisturizing hair, but this cosmetic oil is useful for the scalp, too. The nourishing properties of this oil can reach down into the skin and follicles and provide the nourishment your scalp deserves. Since dandruff is resultant from dried out skin on the scalp, providing moisture and nourishment will prevent this embarrassing occurrence.Avocado Oil Benefit for Hair Damage ProtectionWe all know that sometimes beauty is pain. For your hair this means that heating and styling your hair can lead to some serious damage, which can lead to choosing between gorgeous hairdos or silky, soft hair. But, this oil can help you have it all. Use this cosmetic ingredient to protect your hair to maintain those luscious locks. This way you can show it all off by styling, straightening, and curling. You are going to love your hair!Avocado Oil Benefits for Irritated SkinAnother great property of this cosmetic oil is its ability to calm irritated skin. So, this cosmetic ingredient is helpful for rashes or chafing. Also, this oil would be good at reducing diaper rash. This cosmetic oil is perfect for reducing redness and irritation. So, using this oil will help you to calm your rashes and feel better in no time!

Article
Common Candle Color Meanings: Understanding the Significance
Candles have long been used in rituals, meditation, and spiritual practices, with each color holding its own unique meaning. Understanding the meaning of the colors of candles can help you choose the right one for your intentions. Let’s explore the candle color meanings and how each hue can influence your practice.
What Is the Meaning of the Colors of Candles?
The meaning of the colors of candles is rooted in traditions and symbolism across cultures. Each candle color is thought to hold a specific energy or vibration, making it an essential tool in rituals and spiritual work. Here’s a brief overview of what some standard candle colors represent:
White: Purity, peace, and spiritual connection. White candles are often used for cleansing, healing, and protecting.
Red: Passion, energy, and strength. Red candles are powerful for boosting vitality and boosting love spells.
Yellow: Joy, intellect, and clarity. Yellow candles can help with focus and creativity, making them ideal for studying or problem-solving.
Green: Growth, abundance, and balance. Green candles are often used for prosperity rituals and for attracting wealth.
Blue: Calm, communication, and inner peace. Blue candles are great for meditation, promoting relaxation and spiritual awareness.
Candle Color Meanings: A Complete Guide
Diving deeper into the candle color meanings can help you harness their energy more effectively. Here’s a complete guide to some of the most popular colors and what they symbolize:
Pink: Symbolizes love, compassion, and emotional healing. Pink candles are perfect for self-love rituals or strengthening relationships.
Purple: Associated with spiritual growth, wisdom, and psychic abilities. Purple candles can be used to enhance intuition and connect with higher realms.
Orange: Represents creativity, enthusiasm, and success. Orange candles are often used to boost confidence and attract new opportunities.
Black: Traditionally used for protection, banishing negativity, and grounding energy. Black candles are powerful for warding off negative influences and breaking bad habits.
Brown: Stability, grounding, and home matters. Brown candles are often used in family, pets, and property rituals.
The Meaning of Different Colored Candles for Rituals and Intentions
Each candle color can serve a different purpose, especially regarding rituals and setting intentions. Understanding the meaning of different colored candles can help you align your candle choice with your specific needs. Here’s how some of these colors can be used in spiritual practices:
White Candles: Use for protection, purity, and spiritual awakening. They are versatile and can be substituted for any other color when in doubt.
Red Candles: Ideal for love spells, passion rituals, and boosting physical strength. They often reignite passion in relationships or energize a workout routine.
Yellow Candles: Burn during study sessions or creative projects to enhance mental clarity and focus. They are also great for rituals aimed at manifesting positivity and joy.
Green Candles: Use in money-drawing spells or rituals for personal growth and renewal. Green is a powerful symbol of fertility and new beginnings.
Blue Candles: Light them during meditation or before bedtime to promote calm and peaceful energy. They can also help improve communication and express truth.
How to Choose the Right Candle Color for Your Needs
Choosing the right candle color can enhance the effectiveness of your spiritual practices and help you manifest your desires. Here’s a simple guide to picking the right hue based on candle color meanings:
For Emotional Healing: Pink and blue candles are ideal for those looking to heal emotional wounds or foster a sense of calm.
For Success and Creativity: Orange and yellow candles can help bring fresh ideas and motivate you to achieve your goals.
For Love and Relationships: Red and pink candles are often used in love spells and rituals to attract or deepen romantic connections.
For Spiritual Connection: Purple and white candles can deepen your meditation practice or enhance spiritual awareness.
For Protection: Black and white candles are the go-to choices for creating a protective barrier around yourself or your space.
Exploring the Symbolism Behind Popular Candle Colors
Understanding the different candle color meanings can provide insight into their use in various traditions. Here’s a closer look at the symbolism behind some popular colors:
Gold: Represents success, enlightenment, and divine connection. Gold candles are often used in rituals for wealth, prosperity, and spiritual insight.
Silver: Symbolizes intuition, dreams, and the moon’s energy. Silver candles are perfect for working with lunar cycles and enhancing intuition.
Lavender: A blend of purple and blue, lavender candles offer a balance of spiritual awareness and calm. They are great for self-care rituals and stress relief.
Gray: Associated with neutrality and balance. Gray candles are often used when seeking guidance or clarity during uncertain times.
Whether a beginner or a seasoned practitioner, using the right candle color can add depth and focus to your practice. Each hue offers a unique vibration that can align with your specific intentions, making the meaning of the colors of candles a valuable tool in your spiritual toolkit. When making candles, they can be colored with liquid dye or dry powder and blocks.
Frequently Asked Questions About Candle Color Meanings
Can I use a white candle if I don't have a specific color?White candles are considered universal and can be used as a substitute for any other color in rituals. They represent purity and clarity, making them an excellent choice for any intention.
How do I choose the right candle color for a love spell?Red and pink are the most popular choices for love spells. Red is ideal for passion and desire, while pink focuses on compassion and emotional connection.
What is the best candle color for meditation?Blue and purple candles are excellent for meditation. Blue promotes peace and calm, while purple enhances spiritual awareness and psychic abilities.
By understanding the meaning of different colored candles, you can harness their unique energies to support your goals and create a meaningful atmosphere during your rituals. Whether you're looking to attract love, foster spiritual growth, or simply bring a sense of peace into your space, there’s a candle color that’s perfect for your needs.
Article
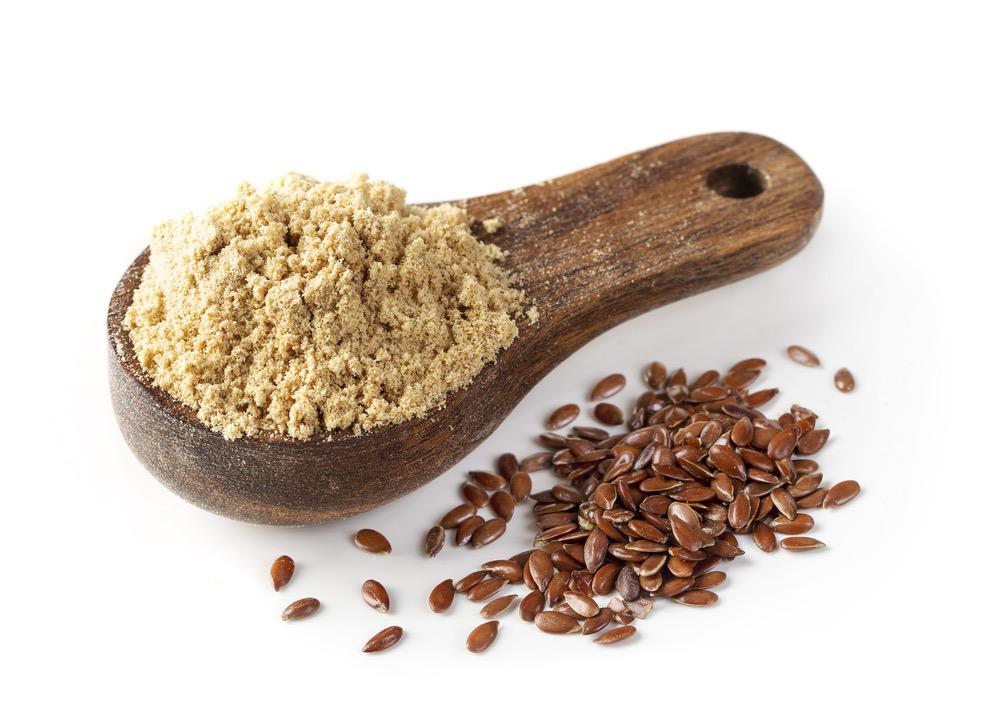
Flax Seed Uses & Benefits
For all the crafters out there, do you like to experiment with different flowers, plants, or herbs? Have you ever tried anything with flax seed before? Flax seed is a fantastic ingredient! It is very versatile and can be used in many different industries! Did you know that in the old original tellings of Sleeping Beauty, she actually pricks her finger on a sliver of flax and not on a spindle? Cool right? Flax seed can be used for soaping, bath and body products, skin care and even hair care!Flax seed is a very beautiful flower, otherwise known as common flax or linseed. It can be either annual or perennial and is part of the Linum genus. In Northern Ireland flax is used as the emblem and in Belarus common flax is the national flower. There are two basic varieties of flax seed, brown or yellow gold. However the flower is a bright pale blue color. In a cave in the country of Georgia, evidence was found that dates flax seed back 30,000 years! Isn t that awesome? Even in ancient Egypt, there were paintings of flax inside temples and priests only wore linens made with flax because it was considered a symbol of purity. Mummies were even entombed with the flax linens!This flower can be used for so many different industries. Soaping, skin care, hair care, and bath and body just to name a few. Do you suffer from migraines or horrible headaches? Flax is a main ingredient in eye pillows to help with the pain! We even have an awesome free recipe for Relaxing Eye Pillows here at Nature s Garden. It is used as a beautiful natural decoration for soaps, and it contains antioxidants that are great for protecting you from heart disease and your skin from skin cancer. Flax seed also helps with many other skin conditions such as psoriasis, dermatitis and rosacea. It also contains omega-3 fatty acids that are great for helping cuts to heal faster and keep your skin smooth and hydrated. For hair care, flax seed helps to prevent hair loss, makes hair easier to manage and provides it with many essential nutrients.Here at Nature s Garden we actually offer whole flax seeds and even a flax seed class! Just type flax seed into the search bar on our site and it will take you right to a page titled Search Results for Flax Seed that offers our class and the seeds. We even have more great free recipes with this wonderful ingredient. Try our Curl Pop Hair Gel recipe or our Silky Hair Gel recipe. Both of those are an amazing treat that you and your hair will both love!For women, ground flax seed may even help with symptoms of menopause like night sweats and hot flashes. But please don t take this blog as medical advice! We only sell flax seed for external use. Always make sure to talk to your doctor before using anything in place of medical treatment! Fun fact! Linseed oil is used for linoleum and printing inks for drying oil. Flax seed is such a versatile product that you will most certainly love it in whatever project you use it for! Please contact us if you have any questions or concerns and keep watch for more Enlightened by Layla!

Article
Can You Use Crayons to Color Candles
In order for your candles to achieve the most vibrant colors or pleasing pastels possible, a candle dye or candle colorant must be used. Using other forms of colorant may result in an nonfunctional candle.Can you use crayons to color candles?Although, staring at a beautiful stack of wonderfully vibrant crayons, we can understand why there would be an urge to use crayons as a colorant for candles. I mean, let's look at what a crayon is...a stick of colored wax, right? Logically, they should work. However, this is absolutely not the case.You should never use crayons to color your candles. The reasoning behind this is the actual colorant of the crayon. These colors are achieved with the use of pigments, and pigments unfortunately are not soluble. What this means is that when a crayon is melted, the color of the crayon breaks down into small pigment particles that exist in a dispersed manner among the melted wax. These pigments appear as if they had changed the color of the wax; like candle dyes do because dyes dissolve into the candle wax, but remember the pigments are simply dispersed.Now, due to the way that a wick works in candles, there must be a melt pool apparent to keep a candle flame going. As the wick continues to burn, the melted wax from the wet pool is pulled through the wick. This is how the fragrance (or hot scent throw) of the candle is released into the air. The problem that coloring with crayons in candles presents is that since the pigments and the wax never combine, the pigments are also pulled up through the wick. But, these pigments will not, unlike the melted wax, flow properly through the wick. These pigments will in fact clog your wick.The results of a clogged wick prevent your candles from burning properly, inhibit your candles hot scent throw, and will even cause your candles to smoke.So, in summary no matter how tempting that box of 64 crayons look, never use crayons to color your candles. You will want to stick with dyes specifically formulated for candle making; Natures Garden offers liquid candle dyes and color block dyes in an array of vibrant colors.

Article
Castor Oil Benefits
We at Natures Garden would like to share with you some awesome castor oil benefits that could work for your entire body. So, this oil could benefit certain aspects of your body on both the inside and the outside. There are benefits to be had for areas like the skin, hair, and even your well being. You can use castor oil to create luxurious bath and body products or you can simply use this oil on its own. Regardless of how you use this cosmetic oil to help, you are sure to benefit from the amazing qualities of this oil. This oil has moisturizing benefits, hair growth stimulation, and much more!Where Does this Oil Originate?Castor Oil is a type of vegetable oil that comes from a specific species of plant. This plant is often called Castor Bean, but its scientific name is Ricinus Communis. The castor bean plant, which is featured to the left, produces the seeds that are pressed to create this wonderful oil. Many believe that this oil has some properties that our bodies can benefit from.Further, it is thought that this plant originated in tropical Africa and that the Egyptians were among the first to utilize this oil. While we have come a long way from that time, castor oil has become widely used for cosmetics, soap, and other products. So, the beneficial properties of this oil have become more widely sought after and used as the years have progressed. So, check out this oil's benefits in a variety of areas to determine whether you could benefit from this cosmetic oil in some way.Castor Oil Benefits for Homemade ProductsHomemade products are only as good as their ingredients. It is important to know exactly what you are looking for to select the ingredients that will provide you with your desired properties. Each oil is unique, so castor oil's properties may or may not be what you are looking to add to your product. While it is a thicker oil, it is an amazing moisturizer with some beneficial properties for various products. So, here is how this oil will act in certain products that you can make at home.Castor Oil Benefits in Soap MakingThis lovely cosmetic oil is great for creating luscious, handmade soaps. For example, our Blackberry Sage Soap Recipe contains castor oil. Since castor oil naturally contains a variety of fatty acids that are great for the skin, this is a perfect soaping oil. First, adding this oil to soap will create a bar that is more conditioning, so your hands will be left softer after using. Plus, this means your body will be better moisturized and more nourished due to this oil. Also, this oil provides a more bubbly and creamy lather in your finished soaps. However, you do want to be careful not to add too much. Soap recipes can contain 5-7% of this wonderful oil. Some will add as much as 10%. However, adding more than 10% castor oil in soap can produce a sticky soap.Castor Oil Benefits Lotion and Body ButterAlso, you could use this cosmetic oil to create lotions, creams, or body butters like our Natural Facial Night Cream Recipe. This oil has properties that are perfect for skin care products. Castor oil is a very conditioning oil that reaches deep into the skin to nourish your body. So, your skin will be softened all the way through and fully hydrated. Further, this oil helps stimulate the production of elastin and collagen, which are very important for beautiful skin. So, this oil can help maintain a more youthful appearance for your skin.Castor Oil Benefits Natural MakeupAnyone creating natural cosmetics could include Castor Oil in some of these products. First, many have found homemade mascara can be made perfectly with this oil. Plus, some believe that castor oil will lead to growing thicker, darker eyelashes over time. Alternatively, you can use castor oil to create an eye makeup remover.Castor Oil Benefits Lip BalmCastor Oil is a perfect cosmetic oil for creating lip balm. This thick, moisturizing oil is perfect for locking in exactly what your lips need. Plus, this oil is perfect for adding extra power to your lip balm recipe that can help bring cracked, dry lips back to life. While you can apply this oil on its own to your lips, we'd recommend adding this oil to other amazing oils to create a perfect lip balm! Be sure to check out our Silky Vegan Lip Balm Recipe, not only is it amazing, it also contains castor oil.Castor Oil Benefits for External CareCastor oil cosmetic oil is full of nutrients that your skin and hair can benefit from using. This oil is moisturizing and full of nutrients. Plus, this oil has been known to have antiviral, anti-inflammation antibacterial, and anti-fungal properties for the skin. In addition, this oil is great for hair growth and conditioning power. Since this oil is fairly thick, some may find it easier to mix this oil into homemade cosmetics before applying. But, you can use castor oil on it own, as well.Castor Oil Benefits for Skin InflammationYour skin can become inflamed for a variety of reasons. This could be due to a recent sunburn, stubborn acne, dry skin, or many other reasons. Regardless, castor oil is great for relief inflammation based issues. This cosmetic oil is a good choice for soothing these dilemmas because it has anti-inflammatory properties that can be utilized by directly applying the oil to the afflicted area. While you can directly apply this oil, you could incorporate this oil into your handmade skin care products.Castor Oil Benefits for Wrinkle ReductionAlso, castor oil is great for reducing wrinkles! This oil nourishes the deeper layers of your skin to rejuvenate the skin. This will lead to healthier skin and reduced wrinkles for some after a few months of applying this oil. This cosmetic oil would be perfect when added to homemade night cream recipes. This way you can add a few other beneficial ingredients to the cream and create the perfect wrinkle reduction. Plus, you will be able to leave this thick, moisturizing oil on your face overnight, so you will get the full benefits of this oil!Castor Oil Benefits for Brittle NailsNot only is this oil great for the skin, but your nails can benefit from castor oil, too. If you have brittle or cracked nails, then this oil is perfect for you. After about a week or so, you should be able to notice a difference. The oil provides your nails with nourishment, which for some, helps them be stronger and healthier. Furthermore, this oil can be used to nourish your cuticles, too. So, you'll have healthy nails in no time.Castor Oil Benefits for Soften CallusesDue to castor oil's strong moisturizing power and anti-inflammatory properties, it is a perfect oil for home callus treatment. While this alone won't remove these hindrances, it certainly helps. First, the oil moisturizes deep into this rough, callused skin to provide a softer feel. Also, the anti-inflammatory properties help to reduce the pain and swelling. So, this oil may make a callus a bit more manageable. Simply soak a cotton ball in castor oil and tape it to the affected area for several hours. Personally, I'd recommend wearing this to bed to get all the benefits without being annoyed by this treatment all day. Also, it may help to pull a sock or glove over the cotton ball after it has been taped.Castor Oil Benefits for Hair CareNot only is castor oil good for the skin, but your hair can benefit, too! This conditioning oil is perfect for moisturizing and caring for the scalp. So, this oil is great for helping treat dandruff. Plus, the healthy acids in this oil restore the roots of your hair and increase circulation. This will stimulate hair growth and help reduce hair loss. Further, this natural hair conditioner it perfect for locking in moisture. This hydrates hair and reduces split ends simultaneously. Furthermore, this moisture locking property makes the hair thicker and darker, which would enhance naturally darker hair colors. Thus, this oil would make a great addition to homemade hair products for certain hair types.Castor Oil Benefits for Growing EyebrowsWhen it comes to eyebrow growth some believe castor oil is one of the best. Whether you are wanting to regrow your eyebrows or wanting help with your thin eyebrows, this oil is just what you need. Castor oil benefits your eyebrows with the same amazing hair growth benefits as it does for the hair on your head. So, this oil will nourish the deeper levels of your skin and stimulate the follicles. This will lead to thicker, lashes because Castor Oil provides the nourishment to stimulate healthy hair growth.Castor Oil Benefits for Beard CareDue to Castor Oil's wonderful benefits for healthy beard growth, this oil was specifically chosen to be included in our recipes for beard soap and beard balm. First, this oil's antibacterial properties and antifungal properties are perfect for helping to keep facial hair clean. Also, the nutrients in the oil are perfect for stimulating growth and leading to a thicker, fuller beard. Also, its conditioning strength perfectly reduces split ends and softens hair. This will lead to more luscious, touchable facial hair that everyone is sure to love. So, adding this to your homemade beard soap or beard balm will keep you looking fresh.Castor Oil Benefits Castor Oil PackMany have found Castor Oil to have beneficial properties for the inside of the body. It is thought that allowing castor oil to sit on your skin for long periods of time could sink into your body and begin to work for you. This is thought to detox your liver, reduce inflammation, and improve lymphatic function. While this has not been officially certified, many people swear by this method of detox. They simply create a pack by soaking a cloth in castor oil and allowing it to set on their skin for between thirty minutes and an hour. Also, they use plastic to wrap the cloth and place heat over the plastic. This could be an electric heat pad or even a hot water bottle.Castor Oil Benefits Sore MusclesAlso, this oil has been said to be great for relieving sore muscles. Since Castor Oil is a warm oil, it promotes circulation in the body. So, adding this oil to your aching body may reduce the pain of overworked muscles. All you need to do is apply the oil and it will absorb and work its magic. You can either rub this oil into the target areas or create a massage oil with other beneficial ingredients. Either way, the soreness should be reduced by this oil.Castor Oil Benefits for Internal CareThis naturally derived oil is a perfect addition to any healthy lifestyle. Not only does this oil care for your body externally, but there are many that believe that Castor Oil has some beneficial properties for your insides, too. Some use this oil as a natural way to detox and clean out the body. So, depending on your body's needs this could be a great oil for you to use.Castor Oil Benefits for ConstipationIn the past, this oil has been medically used to treat constipation. Now, there are those that continue to use castor oil as a laxative. This oil can be used as a stimulant laxative for those that need the assistance. This oil will increase the movement of the intestines, which will help reduce constipation. So, Castor Oil is perfect for those who are a bit backed up and need help moving things along. Just make sure to not take too much at one time, as laxatives have the potential to dehydrate you from extreme cases of diarrhea. This oil is safe in regular doses, but overdoing it can be dangerous. So, you will most definitely want to consult a doctor before ingesting this natural laxative.Note: Natures Garden sells castor oil for external use only. We do not sell this cosmetic oil as a food item. The information that we provide about this oil is for educational purposes only. This information is not intended to diagnose, cure, treat, or prevent any disease. This information has not been evaluated by the Food and Drug Administration.
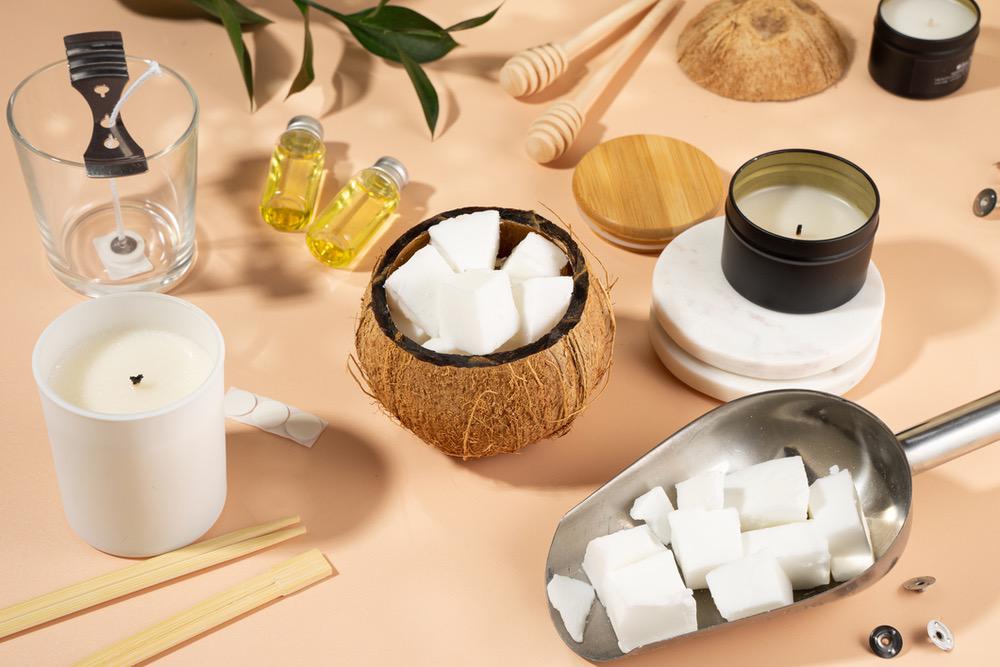
Article
Common Candle Making Questions
All of us at Natures Garden understand that it can be difficult to create perfect candles. Especially if you have serious scent throw issues popping up, it can be frustrating to put time and money into candles that don't work that way you want. So, we want to answer some common candle making questions to prevent confusion and save you from all that extra troubleshooting. So, let's talk about common problems so we can get back to creating gorgeous homemade candles!Candle Wax Questions:How Do You Melt Candle Wax at Home?You can use a pouring pot and a stove top to melt your wax at home. Also, we recommend using a double boiler method where you have a larger pot with water in it and set your pouring pot full of wax inside. Turn the stove on to medium and allow the water in your pot to boil. This will safely heat your wax without letting it get too hot.Which is the Best Wax for Candle Making?Choosing the best wax all depends on preference of what you prefer in a finished candle. First, we have soy waxes that are vegan, gluten free, and natural candle waxes. This is the least expensive wax, has a fantastic cold throw, and has a cleaner burn, but it is tricky to get a great hot throw with some fragrances. Also, Soy Wax often has frosting and a rougher finish.Next, we have paraffin wax, which has the best scent throw, and is in both the Wow Wax and Joy Wax. The Joy wax uses a mixture of paraffin and soy, so it has a cleaner burn due to the soy wax and a really good hot scent throw due to the paraffin wax. Also, it clings to the candle containers better and has less frosting. An option for creating a translucent candle is gel wax, but it isn't compatible with all fragrances.Additionally, you can use palm wax, which comes from sustainable sources, has a beautiful crystal finish, and has a great scent throw. Natures Garden carries sustainable palm container and pillar wax. Lastly, Pillar of Bliss Wax and Palm Pillar wax are great options for creating pillars or wax tarts.Soy Candle Questions:What is the Best Temperature to Pour Soy Wax?This temperature depends on the type of soy wax being used. We recommend pouring our 100% soy wax at 110 degrees Fahrenheit. For the Golden Brands 444 or Golden Brands 464, we suggest pouring at 135 degrees FahrenheitWhat is the Best Temperature to Add Fragrance to Soy Wax?For heavier fragrance oils with high flash points, we recommend adding the scented oil at 185 degrees Fahrenheit. However, lighter fragrances with lower flash points, Ike citrus scents, would be added around 160 degrees FahrenheitWhich Wick is Best for Soy Candles?Many customers perfer to use a cotton wick for their soy candles. We have two types of cotton wicks available, which are HTP and CD candle wicks.How Do You Make Soy Wax Melts?Although we don't carry soy wax in a pillar form for melts, you can still create soy wax melts with container wax. Often, customers will use individual portion cups to package wax melts like these, which can be used to squeeze the wax into the wax burner. This is because it is softer than pillar wax and is difficult to get out of clamshells. However, this wax will not hold the shape from a mold. In fact, it will get stuck in your mold and be difficult to clean. Another option when making wax melts with a container wax is to add stearic acid to the wax to harden it.Fragrance Questions:Why Don't My Candles Have a Good Scent Throw?This issue could have a few different possible causes. First, you may not have added enough fragrance, which should be 1 oz. per pound on average. However, Natures Garden waxes will allow you to add up to 10% in most cases. Also, your candle may have a clogged wick. This could be due to adding too much fragrance, vybar, or another additive. Also, additives like mica and crayons will clog your wick.Another possibility is the type of wax you are using. A wax like paraffin will have a better scent throw than soy waxes. Finally, it is possible that you have the wrong size wick. If you wick is too small, then the flame will not be hot enough to get the aroma into the air. On the other hand, a wick that is too large will burn the scent oil before it can be released into the air.What is Vybar Used for in Candle Making?If you have a poor scent throw and you have tried trouble shooting, then you may want to use vybar. The vybar can be used to increase scent throw by adding some amount between a fourth and a half teaspoon per pound of wax. Just be cautious not to add too much or it can clog your wick and reduce your scent throw. We suggest using Vybar 103 for pillar candles and Vybar 206 for container candles.Why Is Fragrance Oil Settling to the Bottom of the Candle?If you notice that fragrance is settling at either the top or bottom of your candle, then there could be a few reasons to explain it. First, you've added too much fragrance oil. Another option is that the wax you are using isn't porous enough and you may need a more porous wax. Along with this idea, waxes that have been burned or heated too much may reduce in their ability to hold fragrance. Finally, you may have not stirred enough to fully incorporate the fragrance oil.Can You Use Essential Oils in a Wax Warmer?While some essential oils can be used in wax warmers, it can be a bit tricky. You need to make sure that they are diluted with either a carrier oil or DPG. Additionally, some essential oils have flashpoints that are too low for a wax warmer. So, you will want to do some testing with the essential oils that you choose.Wick Questions:Why is My Candle Wick Drowning Out?This could be due to either a small wick or a high candle. First, the wick you used may be too small for a candle of this diameter, which you can use our Candle Wick Chart for reference. Also, your wick could be drowning if you poured your candle wax up too high. You should stop pouring before the wax passes the part of the candle jar that changes shape and begins to curve for the lip.Why Isn t My Candle Wax Not Burning Evenly All of the Way Down?Uneven burning could be due to either the wax or the wick. First, the wick may be too small for your candle's size. Also, the wax that you chose could be too hard. While you could use a softer wax instead, you could also switch to a hotter wick.General Questions:Sometimes I Follow All Recommendations and I Still Can't Seem to Get it Right. Why is That?There are many factors that can influence the outcome of your homemade candles. First, fragrance oils can impact a candle, as thicker scented oils require you to wick up to get a hotter burn. Also, the room temperature can effect your candles. If the room is too cold, then you can have more issues with glass adhesion and frosting because your candle will setup very quickly.Additionally, you could have an issue where the scent doesn't smell as strong because you are used to it. When you are around a scent for too long, your nose will adjust and you won't notice it as much. If this happens to you, then don't worry too much just take a break from the scent for awhile and your nose will recognize it again after a long enough break.Why are My Layers Bleeding in my Candle?This color issue could have one of a few different causes. First, the layers were too hot. If you don't wait long enough or pour your wax too soon, then the layers can melt one another and start to run into one another. Also, it could be due to over saturating your candle with fragrance, as the extra scented oil will blend with colorant and bring the color with it as it seeps out of the candle.Can I Use Mica in Candles?We recommend that you don't mix mica into the candle itself, because it will clog the wick. But, you can use mica to decorate the outside of pillar candles! After your pillar is created you can then, use the mica on the outer portion of your candle. This shimmery mixture can be used to provide a beautiful sparkle on the outside of your candles.Can Mica be used in Wax Melts?Sure! Since we don't have to worry about clogging the wick, you can mix it straight into the candle wax. How Do I Get Rid of the Air Bubbles in My Candles?There are a few reasons why air bubbles could get trapped in your candles, which include water exposure and pouring at a cooler temperature. So, how do you prevent air bubble in a homemade candle? First, keep water away from your work station. Also, you can try pouring your wax at a hotter temperature. Further, pour your candle wax slowly and make sure to stop before you hit pour point where your jar begins to change shape. Can You Melt Old Candles to Make New Ones?We don't recommend re-purposing old candles to make new ones. While this may seem like a create idea to take all you half used candles and make a new one, the scent is a big concern in this case. If these candles are scented, then they will already contain fragrance oil. Once you melt your old candles, the scent may fade, but many of the wax particles are still holding on to some of the scent oil. This means that you won't be able to add enough fragrance oil without over saturating your candle. Since the candle already is holding scent, this extra fragrance will seep out and sit on the top of your candle, which is dangerous and can result in a flame that is too large.Reach Out to UsHopefully, we were able to get some of your more pressing questions answered. If you have any more questions or concerns about making your own candles, then please reach out to us. We are always happy to help! You can stop by the store, give us a call, or talk to us on social media. If you want to find us online, we have a Natures Garden Facebook page, Twitter (@ngscents), and Instagram (@ngscents). Good luck and have fun with candle making!